On this page
Find everything you need to get started with FitConsent Consent Management Platform CMP, from installation to advanced usage.
Introduction
Welcome to the FitConsent Consent Management Platform CMP documentation.
What is a Consent Management Platform (CMP)?
A Consent Management Platform (CMP) is a tool that helps websites legally collect and manage user consent for data processing, which is a requirement under privacy laws like GDPR in Europe and CCPA/CPRA in California. It’s the technology that powers the ‘cookie banners’ you see on many websites.
FitConsent goes beyond a basic banner. It provides you with the tools to not only comply with the law but also to optimize the user experience to build trust and improve consent rates. Our service includes full, automatic support for both Google Consent Mode V2 and Microsoft UET Consent Mode, ensuring that your analytics and marketing tags adjust their behavior based on user consent, an implementation detailed in Google’s guide on Set up consent mode on websites. This adaptability is crucial for maintaining data-driven marketing in a privacy-first world.
Installation & Setup
Integrating FitConsent is designed to be quick and straightforward. You only need to add a single script snippet to the section of your website. This script handles everything from displaying the banner to managing Google and Microsoft Consent Mode defaults.
Important Prerequisite: Consent Mode
Our script automatically sets up the necessary defaults for both Google Consent Mode v2 and Microsoft UET Consent Mode. This is crucial for services like Google Analytics and Microsoft Advertising to operate in a compliant manner based on user consent. Ensure this script is placed as high as possible in your website’s tag, before any other scripts that may use cookies.
Direct Embed
For direct installation, copy the code snippet below and paste it into the <head> section of your website’s HTML. It’s crucial to place it as high as possible, before any other scripts that might set cookies (like Google Analytics or Microsoft UET).
<!-- FitConsent Banner Script -->
<script>
  // Define dataLayer and the gtag helper.
  window.dataLayer = window.dataLayer || [];
  function gtag(){dataLayer.push(arguments);}

  // Initialize Microsoft UET queue
  window.uetq = window.uetq || [];

  // Set default consent states for Google and Microsoft.
  // This MUST run before any other scripts using cookies.
  gtag('consent', 'default', {
    'ad_storage': 'denied',
    'ad_user_data': 'denied',
    'ad_personalization': 'denied',
    'analytics_storage': 'denied'
  });

  window.uetq.push('consent', 'default', {
    'ad_storage': 'denied'
  });
</script>

<!-- Load your other scripts (e.g., Google Analytics, Microsoft UET) here -->
<!-- ... -->

<!-- Load FitConsent Banner to update consent based on user interaction -->
<script async defer src="https://app.fitconsent.com/api/banner?websiteId=YOUR_WEBSITE_ID"></script>
<!-- End FitConsent Banner Script -->
Google Tag Manager (Recommended)
Using our official Google Tag Manager (GTM) Community Template is the recommended way to install FitConsent. It correctly handles Google Consent Mode v2 and ensures tags fire according to user consent.
Step 1: Enable Consent Overview (One-time setup
- 1. In your GTM workspace, click the “Admin” tab.
- 2. Under the “Container” column, click “Container Settings”.
- 3. In the “Additional Settings” section, check the box for “Enable consent overview”.
- 4. Click “Save” in the top-right corner.
Step 2: Add the FitConsent Template
- 1. Go to the “Templates” section in the left sidebar.
- 2. In the “Tag Templates” box, click “Search Gallery”.
- 3. Search for “FitConsent” and click “Add to workspace”.
- 4. Confirm the permissions to add the template.
Step 3: Create a “Google Consent Default” Tag
- 1. Go to “Tags” and click “New”.
- 2. Name the tag “FitConsent – Default Consent”.
- 3. Click “Tag Configuration” and choose “FitConsent” from the list.
- 4. In the “Tag Type” dropdown, select “Google Consent Default”. This will set defaults for both Google and Microsoft.
- 5. In the “FitConsent Website ID” field, paste your unique Website ID from your dashboard.
- 6. For the trigger, select the built-in “Consent Initialization – All Pages”. This is crucial.
- 7. Save the tag.
Step 4: Create the “FitConsent Banner Loader” Tag
- 1. Create another “New” tag. Name it “FitConsent – Banner Loader”.
- 2. Click “Tag Configuration” and again choose “FitConsent”.
- 3. The “Tag Type” should default to “FitConsent Banner Loader”.
- 4. In the “FitConsent Website ID” field, paste your unique Website ID from your dashboard.
- 5. For the trigger, also select “Consent Initialization – All Pages”.
- 6. Save the tag.
Step 5: Configure Your Google Tag
The final step is to ensure your main Google Tag (which sends data to Google Analytics) fires correctly based on the user’s consent.
A) If you already have a Google Tag (e.g., “G-XXXXXXXXXX”) in your container:
- 1. Click on your Google Tag to edit it.
- 2. Go to “Advanced Settings” > “Consent Settings”.
- 3. Ensure that “No additional consent required” is selected. The FitConsent template handles the consent signals for you.
- 4. Save your tag changes.
B) If you DO NOT have a Google Tag yet:
- 1. Click “Tags” > “New”.
- 2. Name the tag “Google Tag – GA4” or similar.
- 3. For “Tag Configuration”, choose “Google Tag”.
- 4. Enter your GA4 Measurement ID in the “Tag ID” field (e.g., “G-XXXXXXXXXX”).
- 5. For “Triggering”, select “Initialization – All Pages”.
- 6. Go to “Advanced Settings” > “Consent Settings” and ensure “No additional consent required” is selected.
- 7. Save the tag.
Step 6: Handling Other Scripts (e.g., Microsoft Clarity, Facebook Pixel)
FitConsent’s integration with Google Consent Mode v2 allows you to manage any third-party script through GTM. Here’s how you would configure a tag like Microsoft Clarity:
- 1. Add the Tag: Add your third-party tag to GTM (either through a Community Template or as a Custom HTML tag).
- 2. Configure Consent Settings: Edit the tag, go to “Advanced Settings” > “Consent Settings”.
- 3. Add Consent Check: Select “Require additional consent for tag to fire”. A table will appear.
- 4. Choose Consent Type: Click “Add Required Consent” and select the appropriate consent type. For an analytics tool like Clarity, you would choose
analytics_storage. For a marketing script like a Facebook Pixel or a Microsoft UET tag, you might add bothad_storageandanalytics_storage. - 5. Set the Trigger: Set the tag’s trigger to fire on your standard page view event (e.g., “Initialization – All Pages” or a custom “Page View” event).
Now, GTM will automatically check the consent state provided by FitConsent. The Microsoft Clarity tag will only fire after the user has accepted the “Analytics” category on your consent banner, and a UET tag will only fire if “Marketing” is accepted.
Finally, click “Submit” and “Publish” your GTM container to make the changes live.
FitConsent CMP a Consent Management Platform WordPress Plugin
Integrates FitConsent with WordPress and the WP Consent API for seamless Google Site Kit compatibility.
FitConsent is a powerful yet simple Consent Management Platform (CMP) designed to help you comply with privacy regulations like GDPR and CCPA. This plugin makes it incredibly easy to add the FitConsent banner to your WordPress site. Most importantly, it provides automatic, out-of-the-box compatibility with the WP Consent API, which is the standard used by Google Site Kit.
By using this plugin, you can enable Google Site Kit’s consent mode feature and be confident that your users’ consent choices are respected, allowing for compliant and effective analytics and ad tracking.
Key Features
- Simple Setup: Just enter your FitConsent Website ID and the plugin handles the rest.
- Google Site Kit Ready: Works seamlessly with Google Site Kit’s consent mode by integrating with the WP Consent API.
- Lightweight: The plugin is lean and doesn’t add any bloat to your website.
- Standardized Communication: Ensures consent signals are passed correctly between your consent banner and other plugins.
Installation Guide
Method 1: Installation via WordPress Dashboard
- Log in to your WordPress dashboard.
- Navigate to Plugins > Add New.
- In the search bar, type “FitConsent CMP” and press Enter.
- Find the “FitConsent CMP” plugin in the search results and click Install Now.
- After installation, click Activate.
Method 2: Manual Installation via FTP
- Download the FitConsent CMP plugin from the official source.
- Unzip the downloaded file to extract the
fitconsent-cmpfolder. - Connect to your website’s server using an FTP client (e.g., FileZilla).
- Navigate to the
/wp-content/plugins/directory. - Upload the entire
fitconsent-cmpfolder into this directory. - Go back to your WordPress dashboard, navigate to Plugins > Installed Plugins, and click Activate for “FitConsent CMP”.
Post-Installation Configuration:
- In your WordPress dashboard, go to Settings > FitConsent.
- Locate your FitConsent Website ID from your FitConsent Dashboard.
- Enter this ID into the provided field and click Save Changes.
Integration with Google Site Kit (If applicable):
- If you are using the Google Site Kit plugin, go to its settings.
- Ensure that the Consent Mode option is enabled.
Other Platforms (CMS)
You can use FitConsent with any website or Content Management System (CMS) like Drupal or Shopify that allows you to add custom HTML or JavaScript code. We strongly recommend using their Google Tag Manager integration if available and following the GTM instructions above. Otherwise, you can use the “Direct Embed” method.
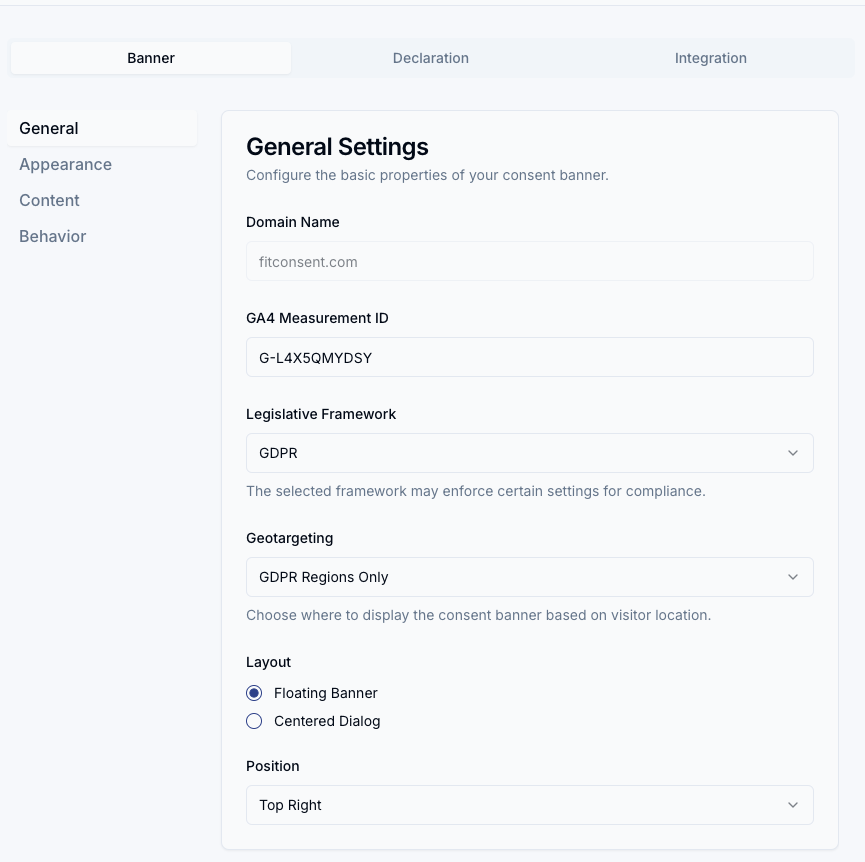
Configuring Your Banner
Tailor the banner’s appearance, content, and behavior from your dashboard.
General Settings
Framework: Choose the primary privacy regulation you need to comply with (e.g., GDPR, CCPA). This choice adjusts the banner’s default behavior and available options to align with that framework’s requirements.
Consent Mode Configuration
This guide explains how to configure FitConsent Consent Management Platform (CMP) for your website. FitConsent offers two distinct configuration modes—Advanced and Basic—giving you the flexibility to balance marketing data needs with strict privacy compliance.
1. Choosing Your Configuration Mode
Before installation, decide which mode best fits your business and regulatory requirements.
Advanced Mode (Recommended)
Best for: Data-driven marketing, Google Ads optimization, and Google Analytics 4 (GA4).
In Advanced Mode, Google tags load immediately but strictly adhere to privacy signals.
- Before Consent: Tags load but send “cookieless pings” (anonymous signals) with consent denied. No cookies are set.
- After Consent: Tags update to full data collection capabilities.
- Benefit: Enables Google’s Conversion Modeling, recovering lost data for attribution even when users decline cookies.
Basic Mode (Strict Privacy)
Best for: Highly strict privacy policies or jurisdictions requiring zero data transmission before consent.
In Basic Mode, all Google tags are completely blocked until the user actively grants consent.
- Before Consent: No Google tags run. No data is sent to Google servers.
- After Consent: Scripts are unblocked and load normally.
- Trade-off: You lose all data from users who do not consent, including anonymous modeling data.
2. Setting Up Advanced Mode (Default)
This is the default configuration for FitConsent. It requires no changes to your existing Google tags.
Step 1: Configure Settings
Ensure your FitConsent configuration is set to ‘advanced’.
Step 2: Install the Embed Code
Copy the Advanced Mode embed code from your FitConsent dashboard. It must be placed before your Google tags in the <head> of your website.
HTML
<script>
  window.dataLayer = window.dataLayer || [];
  function gtag(){dataLayer.push(arguments);}

  // Sets consent defaults BEFORE tags load
  gtag('consent', 'default', {
    'ad_storage': 'denied',
    'ad_user_data': 'denied',
    'ad_personalization': 'denied',
    'analytics_storage': 'denied'
  });
</script>

<script async src="https://www.googletagmanager.com/gtag/js?id=G-XXXXXXX"></script>
<script>
  window.dataLayer = window.dataLayer || [];
  function gtag(){dataLayer.push(arguments);}
  gtag('js', new Date());
  gtag('config', 'G-XXXXXXX');
</script>

<script async defer src="https://app.fitconsent.com/api/banner?websiteId=YOUR_WEBSITE_ID"></script>
Step 3: Verification
- Load your website in a private/incognito window.
- Open the Developer Tools (F12) > Network tab.
- You should see requests to Google Analytics (
collect?v=2...) immediately, even before clicking “Accept.” - Check the request payload for
gcs=. It should indicate denied consent (e.g.,G100).
3. Setting Up Basic Mode (Strict Blocking)
This configuration prevents any Google tags from firing until consent is given. This requires modifying your Google tag scripts manually.
Step 1: Configure Settings
Change your FitConsent configuration to ‘basic’.
Step 2: Install the Embed Code
Use the Basic Mode embed code. Note that it does not include the default consent signals script found in Advanced Mode.
HTML
<script async defer src="https://app.fitconsent.com/api/banner?websiteId=YOUR_WEBSITE_ID"></script>
Step 3: Block Your Google Tags
You must manually modify your Google Analytics or Tag Manager scripts to prevent them from running automatically.
- Change
type="text/javascript"(or default) totype="text/plain". - Add the
data-cookieconsentattribute matching the tag category (e.g., “analytics” or “marketing”).
Before (Standard Google Tag):
HTML
<script async src="https://www.googletagmanager.com/gtag/js?id=G-XXXXXXX"></script>
After (Blocked Google Tag):
HTML
<script
  type="text/plain"
  data-cookieconsent="analytics"
  async
  src="https://www.googletagmanager.com/gtag/js?id=G-XXXXXXX">
</script>
Category Mapping Guide:
data-cookieconsent="analytics"→ Use for Google Analytics (GA4)data-cookieconsent="marketing"→ Use for Google Ads, Facebook Pixel, LinkedIn Insightdata-cookieconsent="functional"→ Use for Chatbots or personalization tools
Step 4: Verification
- Clear your browser cookies and load your page.
- Open Developer Tools > Network tab.
- Ensure no Google Analytics requests appear.
- Click “Accept” on the banner.
- Verify that the Google Analytics script now loads and the request appears in the Network tab.
4. Troubleshooting & Testing
Use the debug parameter to verify your installation.
Add ?fitconsent_debug=true to your URL (e.g., https://yoursite.com?fitconsent_debug=true).
- In Advanced Mode: The console should confirm: ✅ “Consent defaults loaded before Google tags.”
- In Basic Mode: The console will track when blocked scripts are unblocked after consent is granted.
Migration Note
If you are switching from Advanced to Basic:
- Update your configuration setting.
- Remove the “Consent Default” script block from your code.
- Manually add
type="text/plain"to all your tracking tags. - Clear your cookies and test.
Comparison Table
| Feature | Basic Mode | Advanced Mode |
| Google Tags | Blocked until consent | Load immediately (restricted) |
| Pre-consent Data | Zero data collected | Cookieless pings (modeling) |
| Privacy Level | Strictest | Balanced (GDPR/DMA compliant) |
| Implementation | Requires manual tag changes | Simple copy-paste |
| Conversion Modeling | ❌ Not available | ✅ Available |
Geotargeting (Premium): Choose to show the banner only to visitors from specific regions, like the EU.
Layout: Select between a floating banner (at various screen positions) or a centered dialog that overlays your content.
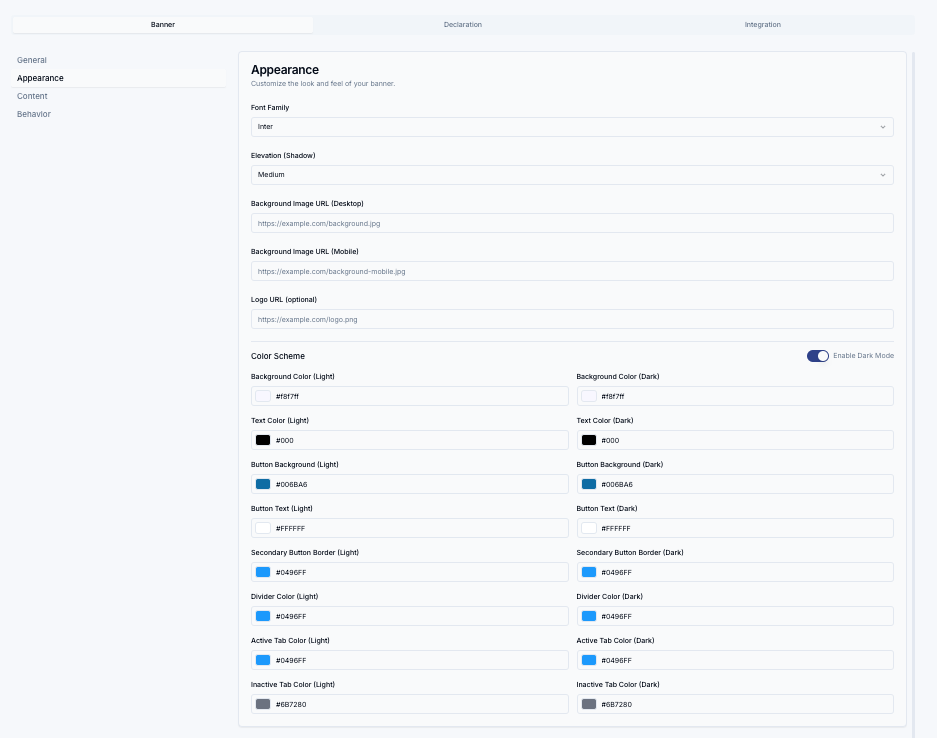
Appearance
Customize colors, fonts, and elevation (shadows) to match your brand’s look and feel perfectly.
Logo & Background Image: You can also add your company logo or even a background image to the banner for a fully branded experience.
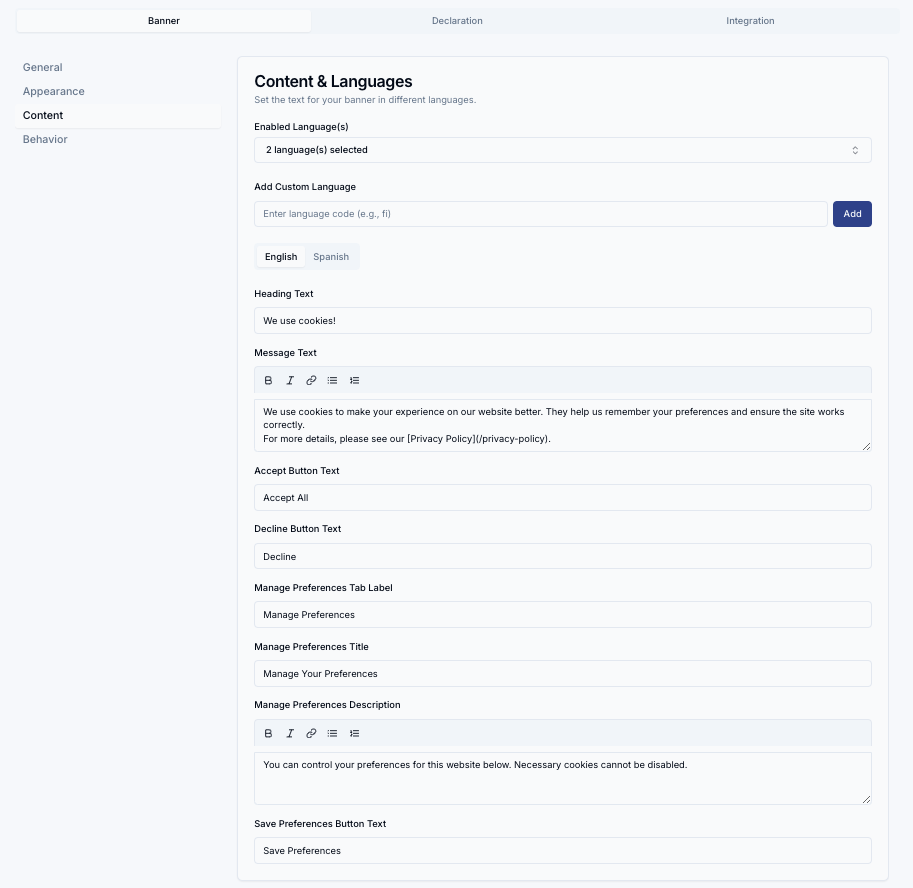
Content & Languages
Edit all text on the banner and preferences modal. FitConsent supports multiple languages, allowing you to provide a native experience for all your users. Basic Markdown is supported in the main text fields.
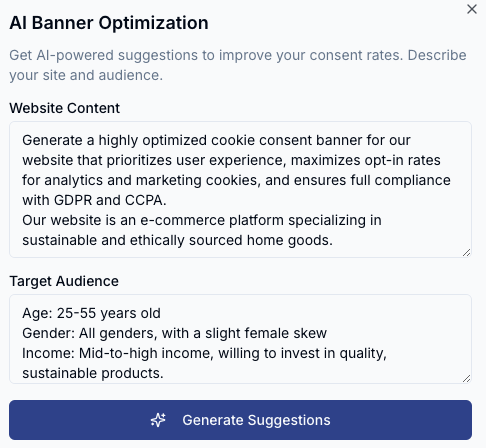
AI-Powered Optimization
Use our AI-powered optimizer to get suggestions on colors, text, and layouts that are proven to increase consent rates based on your website’s content and target audience.
Consent Management Platform (CMP): Storage Declaration
FitConsent can display a detailed, auto-updating list of the cookies and other storage items your site uses. This is often included on a Privacy Policy page to provide full transparency to your users.
Embedding the Declaration
To display the cookie declaration, you need to add a simple `<div>` element to your page where you want the table to appear, and then include our declaration script. You can find the exact code snippet for your website in the ‘Cookie Declaration’ tab of your website’s configuration page.
Standard HTML Websites
For standard HTML websites, or websites built with CMSs like WordPress (without a headless React frontend), you can add the following snippet directly to your page’s HTML.
The script will automatically find the `<div>` with the ID `fitconsent-declaration` and inject the cookie table into it.
<div id="fitconsent-declaration"></div>
<script async defer src="https://app.fitconsent.com/api/declaration?websiteId={websiteId}"></script>
React & Next JS Websites
To prevent “hydration errors” in React-based frameworks like Next.js, it is crucial that the declaration script does not modify the page before React has finished its initial render on the client.
The recommended way to achieve this is to create a dedicated client-side component that loads the script using a useEffect hook.
- Create a Client Component
Create a new component file, for example StorageDeclarationEmbed.tsx. Make sure to include the "use client"; directive at the top.
'use client';

import { useEffect } from 'react';

type StorageDeclarationEmbedProps = {
  websiteId: string;
};

export function StorageDeclarationEmbed({ websiteId }: StorageDeclarationEmbedProps) {
  useEffect(() => {
    const script = document.createElement('script');
    script.src = `https://app.fitconsent.com/api/declaration.js?websiteId=${websiteId}`;
    script.async = true;
    script.defer = true;

    const container = document.getElementById('fitconsent-declaration');
    if (container) {
      container.appendChild(script);
    }

    return () => {
      // Clean up the script when the component unmounts
      if (container && container.contains(script)) {
        container.removeChild(script);
      }
    };
  }, [websiteId]);

  return <div id="fitconsent-declaration"></div>;
}
2. Use the Component on Your Page
Now, you can import and use this component on any page, such as your privacy policy page.
import { StorageDeclarationEmbed } from '@/components/StorageDeclarationEmbed'; // Adjust the import path

export default function PrivacyPolicyPage() {
  return (
    <div>
      <h1>Privacy Policy</h1>
      {/* ... other content ... */}

      <h3>Storage Declaration</h3>
      <p>
        For full transparency, the following is a list of the specific cookies and
        other storage items that our service may place on your browser.
      </p>
      <StorageDeclarationEmbed websiteId="YOUR_WEBSITE_ID" />

      {/* ... other content ... */}
    </div>
  );
}
This approach ensures the script is loaded and executed safely on the client side, avoiding any conflicts with the React rendering lifecycle.
Consent Management Platform (CMP): Advanced Usage
Leverage consent data and understand banner behavior.
Using Consent Data on Your Website
After a user interacts with the banner, FitConsent stores their choices and geolocation data in a cookie named fitconsent_given. You can read this cookie on the client-side or server-side to tailor the user experience.
Cookie Structure
The cookie contains a JSON object with two main keys: <code>choices</code> and <code>geo</code>.
choices: An object where keys are the consent categories (e.g., `marketing`, `analytics`) and values are `true` or `false`.
geo: An object containing the user’s geographical information (e.g., country code, state) at the time of consent.
{
  "choices": {
    "marketing": true,
    "analytics": true
  },
  "geo": {
    "country": "US",
    "state": "CA"
  }
}
Example: Show a Component Based on Consent
Here’s how you could show a special promotional banner only to users in California who have consented to marketing cookies.
import { useState, useEffect } from 'react';

function PromotedFeatures() {
  const [show, setShow] = useState(false);

  useEffect(() => {
    const cookie = document.cookie
      .split('; ')
      .find(row => row.startsWith('fitconsent_given='));

    if (cookie) {
      try {
        const consent = JSON.parse(decodeURIComponent(cookie.split('=')[1]));
        // Example: Check if the user is in California and consented to marketing
        if (consent?.geo?.state === 'California' && consent?.choices?.marketing) {
          setShow(true);
        }
      } catch (e) {
        console.error('Error parsing FitConsent cookie', e);
      }
    }
  }, []);

  if (!show) {
    return null;
  }

  return (
    // Your component for users who consented to marketing
    <div>Special Promotion for California!</div>
  );
}
Automatic Language Detection
The FitConsent banner automatically detects the user’s preferred language and displays the appropriate translation if you have provided one. This process follows a specific order of precedence:
- 1. It first checks for the `lang` attribute on your website’s html tag (e.g., <html lang=”fr”>). This is the most reliable method.
- 2. If the `lang` attribute is not present, it will use the user’s browser language settings (`navigator.language`).
- 3. If neither of the above provides a match for your configured languages, it will fall back to English (`en`) or the first language in your selected list.
Best Practice
For best results on multilingual sites, ensure your page’s <html> tag correctly reflects the current language displayed to the user.